
The course on how to write the "あ" in hiragana beautifully【Part 1】
Hi, I am "Teto".
This is Japanese calligraphy course that enables anyone to learn to write beautiful Japanese characters!
In this article, I will explain how to write the "あ" in hiragana beautifully.
The "あ" is a difficult character, so I will explain it in two parts.
In my Youtube video, I explain it in 3 parts, taking almost 30 minutes to explain it in detail.
I'm probably more detailed than anyone else, but it's in Japanese.
My video add furigana(phonetic characters placed above kanji), so you can use it to study Japanese!
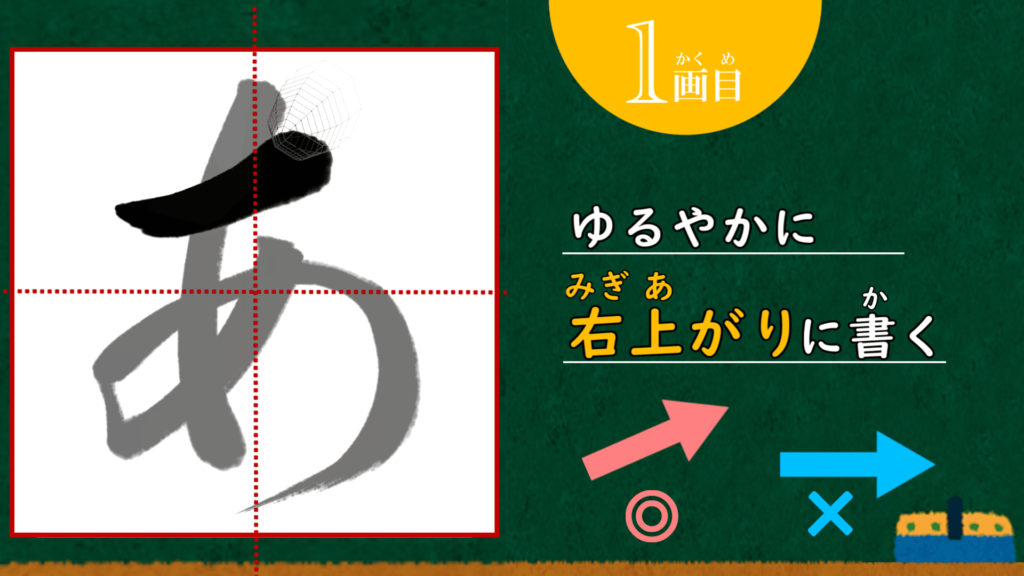
The first stroke
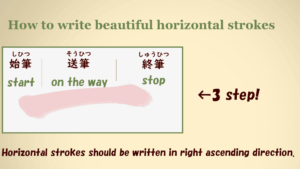
The first horizontal stroke is written with the right side up.
I have previously posted an explanation of how to write horizontal strokes, so please refer to that as well (↓).
Hiragana is also characterized by being more rounded than kanji.
Therefore, when I write the horizontal stroke of "あ", I write it a little curved.
How to write horizontal strokes [The most basic skill of calligraphy ]
Japanese calligraphy course that enables anyone to learn to write beautiful Japanese characters! I will explain "how to write horizontal strokes with writing …

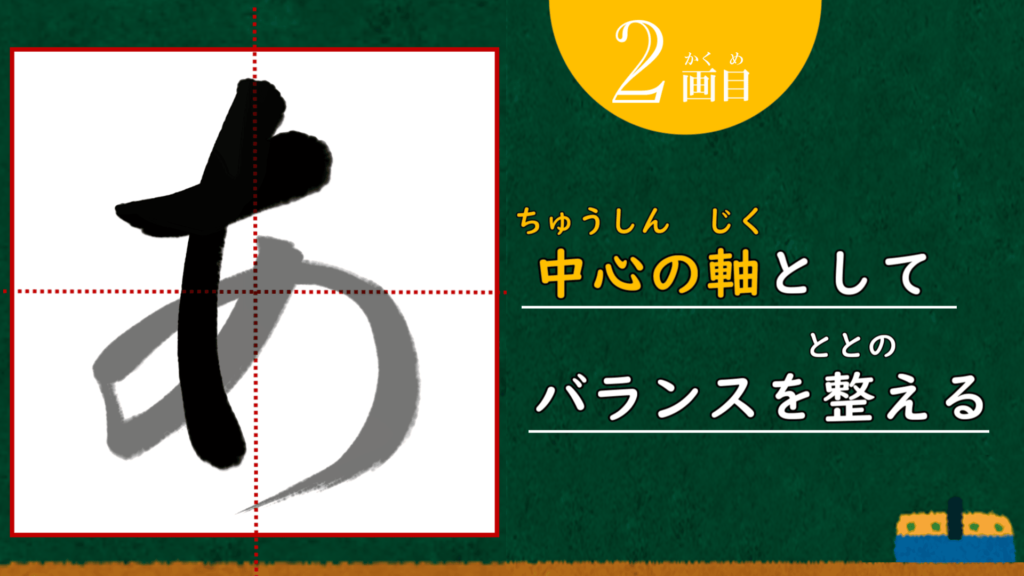
The second stroke
The second stroke acts as the central axis of the "あ".
By positioning it firmly near the center line, the "あ" becomes stable.
There are two key points to make the second stroke act as the central axis.
(1) "Start" stroke should be on the center line.
(2) "Stop" stroke" should be on the center line or slightly left of the center.
Check the position of the start and stop stroke!
The key is not to write in a straight line, but to write in a curved line that bends to the left.
As I mentioned in the explanation of the first stroke, it is important to write hiragana in a curved line (too much is not good).
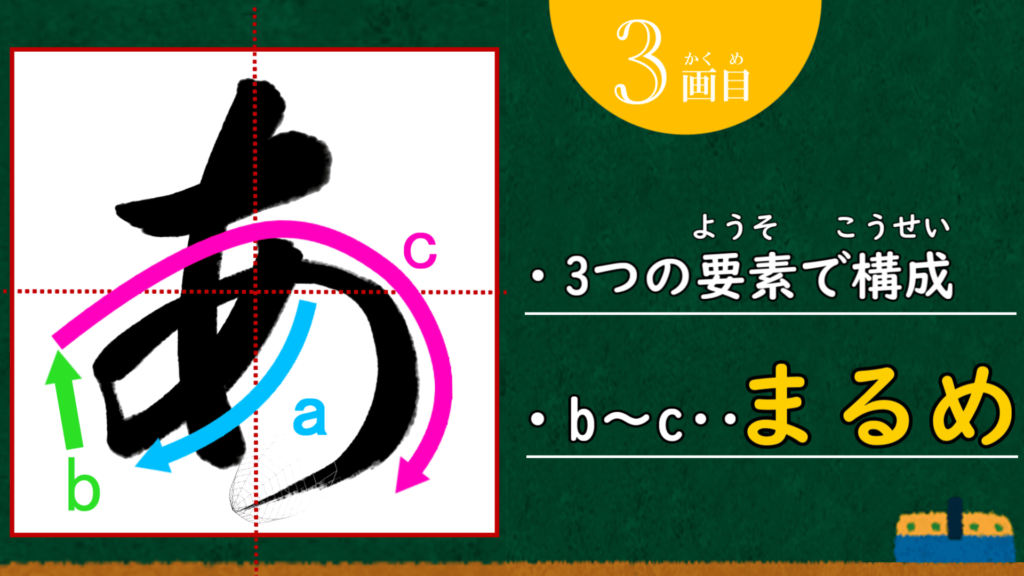
The third stroke
The third stroke is quite complex, so I will divide it into three parts, a through c.
b~c are まるめ(rotation)" which is a brush stroke peculiar to hiragana.
"Rotation" is quite difficult among the hiragana strokes.
Therefore, there may be many people who have difficulty with "あ".
However, once you master "rotation", "あ" will quickly become your favorite character!
If you keep the points in mind and practice, you will get good at it, so please continue to read the explanation.
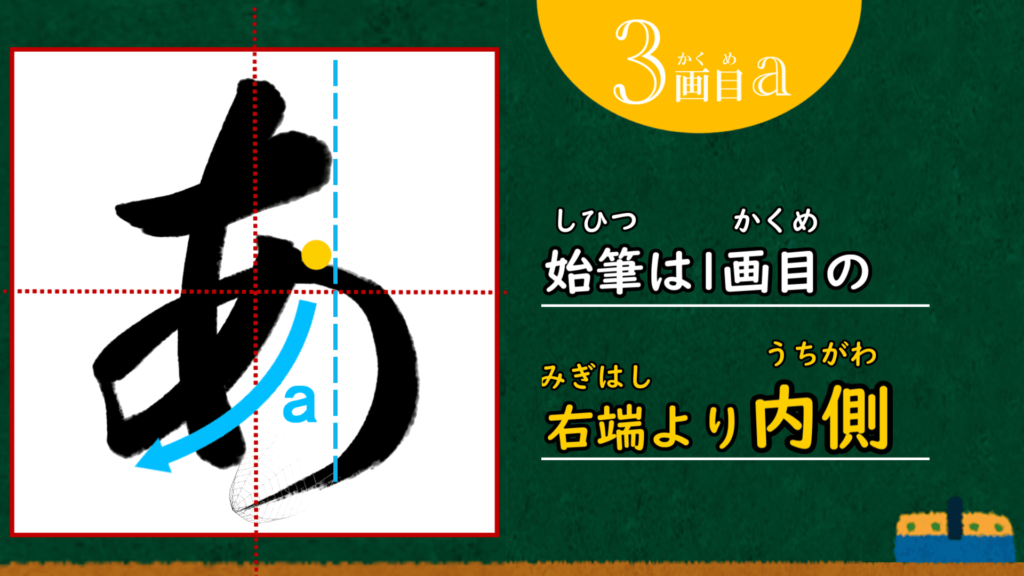
The third stroke a~b
First of all, before "rotation", let me explain the start stroke of the third stroke.
The start of the third stroke is inside the second stroke.
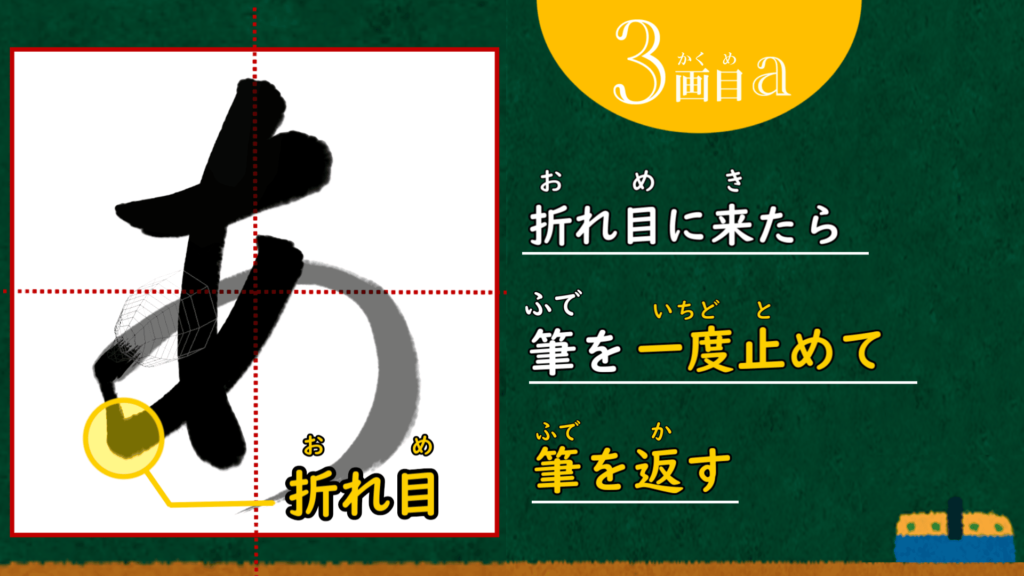
When you reach the joint, stop the brush once.
After that, turn over the brush, change direction, and continue to write "b".
Do you have any idea what "turning over brush " means?
It is difficult to explain in words.
It is the action of "turning over the brush to use different sides of the brush hair.
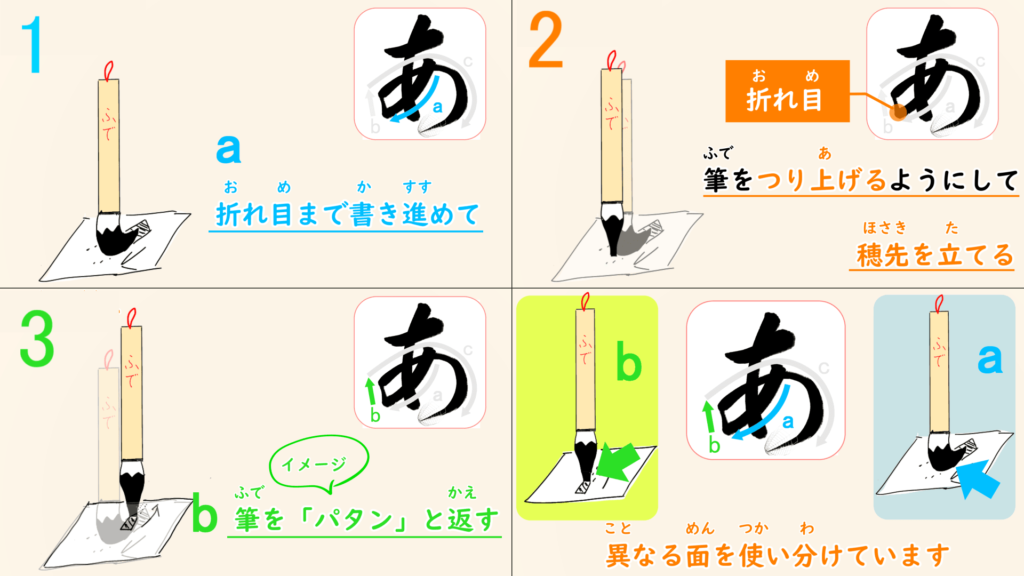
The above four frames show the movement of the brush. As you can see, it is necessary to control the brush hair freely.
I think it is easier to understand if you listen to the explanation while visualizing.
I hope you will watch my video.
The third stroke "c", 『rotation』and『falling stroke』
rotation
Lastly, I will explain the 『rotation』 and 『falling stroke(はらい;harai)』 .
This is also explained in the video above.
The important thing is the movement of brush tip.
In the third stroke " c", it is important that the brush tip moves from the outside to the inside, as shown in the four-frame image below.
In the image, the brush tip is represented by a wire frame. (Application used: Zen Brush 2)
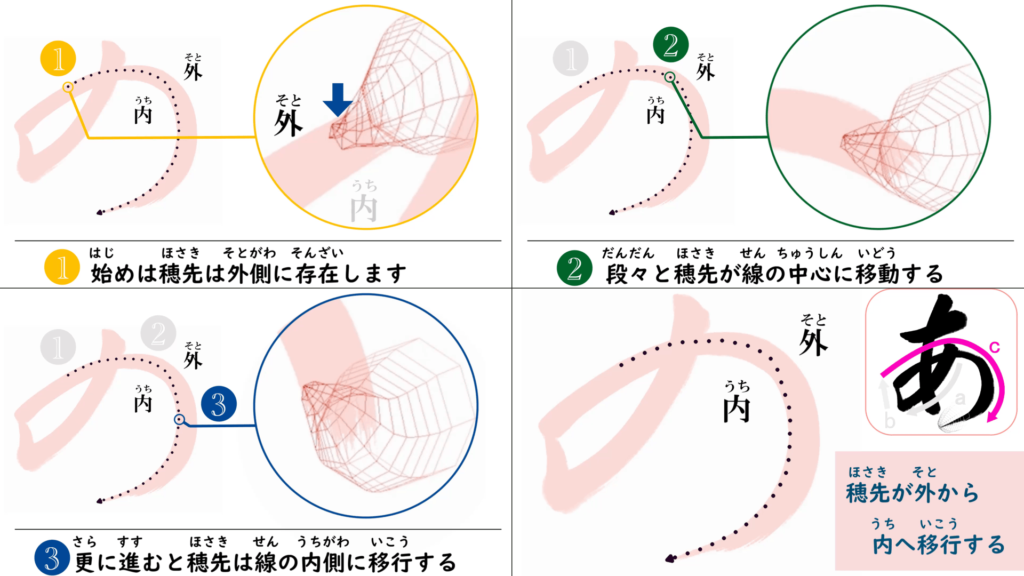
This image may be a little difficult to comprehend, but you will be convinced when you actually try to write with writing brush.
If you relax your wrist and fingers without twisting them, the brush tip will shift from the outside to the inside naturally.
Once you can do this, you'll be so much more advanced! Trust me , try it!
Please refer to my article below for more information about the brush tip.
What you should know about calligraphy before you hold writing brush.【The region of writing brush】
A calligraphy course that anyone can learn to write well. If you understand "what region of writing brush to be conscious of when moving the brush," you will b…
When writing rotation, the key is to move your arm widely without twisting your wrist or turning the brush stem in a strange way.
That way, you can move the brush naturally.
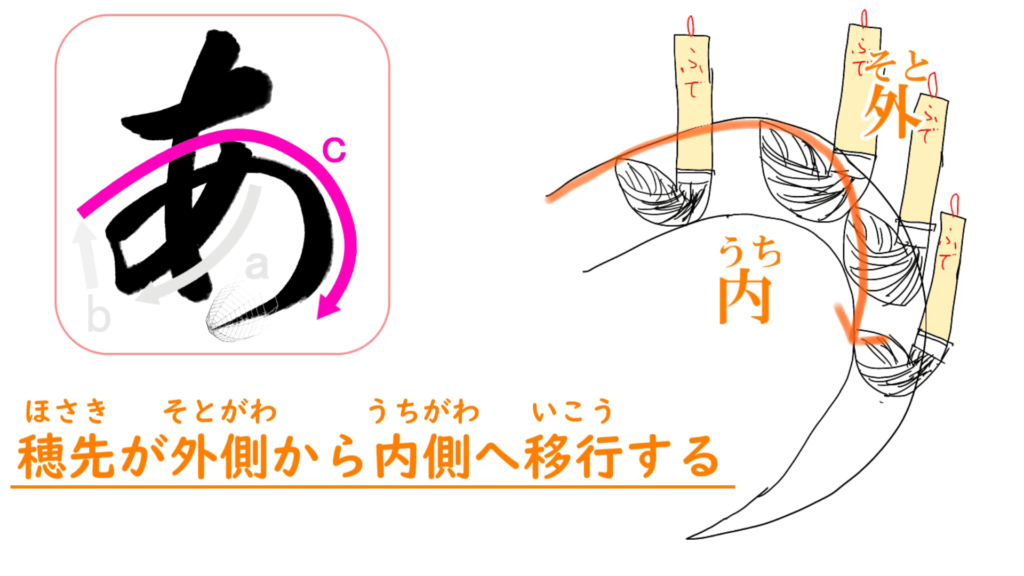
Sorry for the very poor drawing, but the actual brush movement when writing rotation is as shown above.
What you should pay attention to is the movement of the brush tip and the direction of the brush stem (brush stick).
The brush tip moves from the outside to the inside, as described above.
And do you see that the brush stem faces the same direction throughout the process?
(In the illustration, the side marked "ふで" is facing the front all the time.)
If you twist your wrist or something, you will turn or tilt the brush stem abnormally.
If you twist your wrist or something, you will turn or tilt the brush stem abnormally.
The key is to hold the brush stem upright and carry the brush without turning it.
(This is a very important basis for writing with a brush, not only for rotation!)
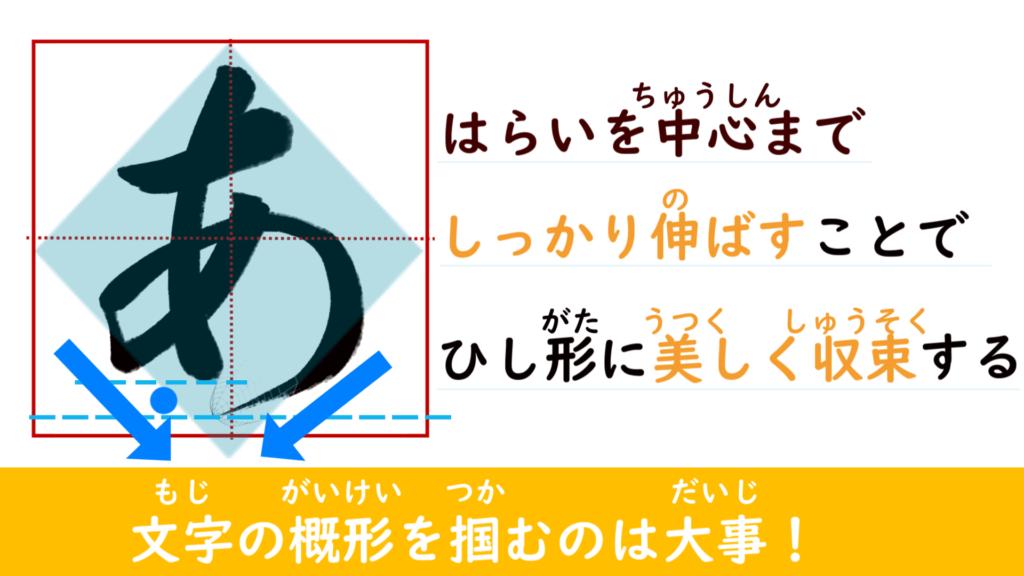
falling stroke
After rotation, we proceed to the falling stroke(はらい;harai), and there are two points to remember.
① Keep the brush tip inside the line (do not lift the brush tip to the end, but leave it there as you go).
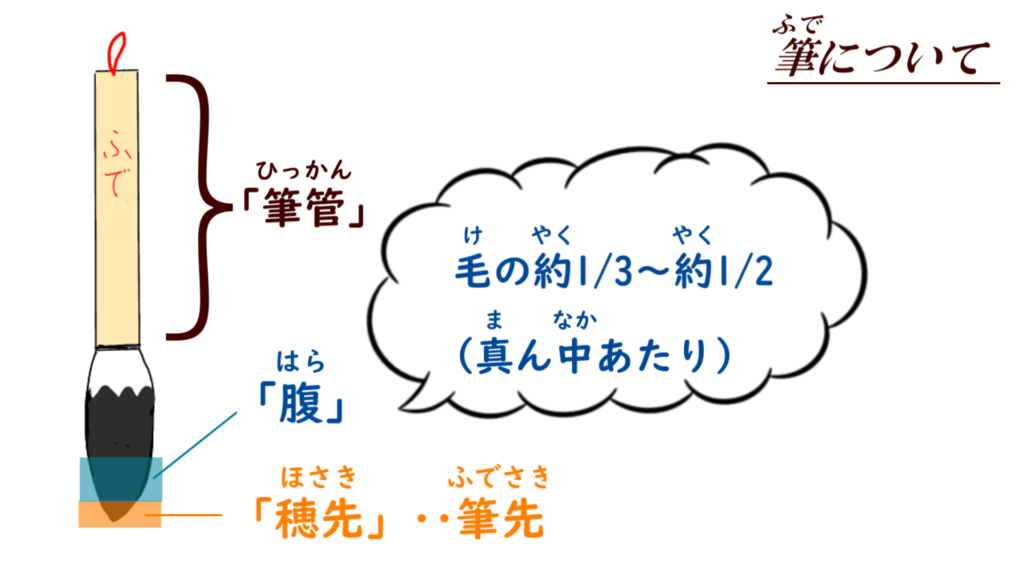
(2) Lift up the belly of the brush little by little.
(belly;the middle of the brush hair)
This will help you write a beautiful falling stroke.

This is the end of the first part of the explanation.
In the second part, we will explain the key points for arranging the "あ" character beautifully.
The course on how to write the "あ" in hiragana beautifully【Part 2】
This is the explanation of how to write "A" beautifully (Part 2). I will explain how to balance the whole character and how to arrange its shape! The key point…

I like reading an article that will make people think. Also, thank you for permitting me to comment!
Thank you for your encouraging comments!
I enjoy reading a post that can make people think. Also, thanks for allowing for me to comment!
I'm glad you enjoyed it.
Thank you for your comments.